MS OneNote Class Notebook
![]()
Microsoft OneNote Class Notebook is a digital notebook designed to support teaching and learning by combining structure with flexibility. It provides teachers with a central space to distribute materials, collaborate with students, and give personalised feedback, while students benefit from their own private workspace alongside shared class resources.
Seamlessly integrated with tools like Microsoft Teams and Brightspace, Class Notebook creates an engaging, interactive environment that extends beyond traditional course management systems.
Good use cases for OneNote Class Notebook include:
- Lab reports
- Project mapping (especially group projects)
- Digital logbook
- Research notebook
- ePortfolio
- Online collaborative space for students
- Formative feedback for student progression
Explore the topics below to find out how you can leverage OneNote Class Notebook to enhance teaching and learning.
As a teacher, you may wonder: "Why would I use OneNote when Brightspace already does a lot of what I need?"
While Brightspace as our VLE provides excellent content management and interactivity, OneNote Class Notebook provides an entirely different pedagogical layer:
- OneNote works alongside Brightspace, not in place of it, offering a highly interactive, creative space for teaching and learning.
- It enables live, fluid interaction with student work in ways VLEs typically do not.
- It creates personalised, real-time learning spaces that can replicate and even enhance the feel of a traditional classroom notebook.
- It supports inking, sketching, brainstorming, and embedded media in a more intuitive and student-friendly format.
You could think of the VLE as a more static and curated collection of learning materials, and OneNote Class Notebook as a live and fluid assembly area for ideas and work in progress.
The goal is to integrate your OneNote Class Notebook with Brightspace, and to extend the capabilities of both with a tool built for dynamic, formative engagement. See more about Brightspace integration below.
When setting up a OneNote Class Notebook, it's a good idea to create a master version of your notebook first and add students at a later stage. This is recommended because OneNote Class Notebook does not have a built-in feature to temporarily hide the notebook from students once they’ve been added. Students will be able to access the notebook as soon as they are added to it.
This resource will lead you through the process of creating and setting up a class notebook.
Select the Start button or the link below to access the resource.
The Teacher-Only area in OneNote Class Notebook is a private space visible only to teachers, making it ideal for lesson planning, storing resources, or drafting activities before sharing them with students.
To add content, navigate to the Teacher-Only section of your notebook and create a new page. From there, you can type notes, insert images, attach files, or embed multimedia such as videos and links.
Content placed here remains hidden from students until you choose to move or distribute it to the Content Library or individual student sections. It is important to remember to prepare content in the Teacher-Only area and not in the Content Library.
How to Add Content to the Teacher-Only Area
- Open your Class Notebook and go to the Teacher-Only section in the navigation pane.
- Add a new page by selecting Add Page at the bottom of the section.
- Enter your content by typing text directly or pasting from other documents.
- Insert additional materials using the Insert menu (e.g., images, files, links, multimedia, embed codes).
- Use drawing tools to add handwritten notes, diagrams, or equations.
- Keep your work private. Students cannot see this area until you choose to copy or distribute pages into their sections or into the Content Library.
This resource will lead you through the process of organising and content to your class notebook.
Select the Start button or the link below to access the resource.
Once you have created a content page for your students, such as lab homework or a template for a report or ePortfolio, you firstly add it to the appropriate student section that you created at the set-up stage, for example, a section called Homework or Reflections.
You then distribute the page to your students so that they receive the distributed page in their own section of the notebook and can work on the task at hand.
Do note that once the page has been distributed to students, any changes you as teacher make to the original page won't sync automatically. In that case a teacher must distribute the amended page to students a second time.
Also please note that if you are using the OneNote Class Notebook within Brightspace (please see the section below on Integrating OneNote Class Notebook with Brightspace) you must still use this distribution workflow within One Note itself.
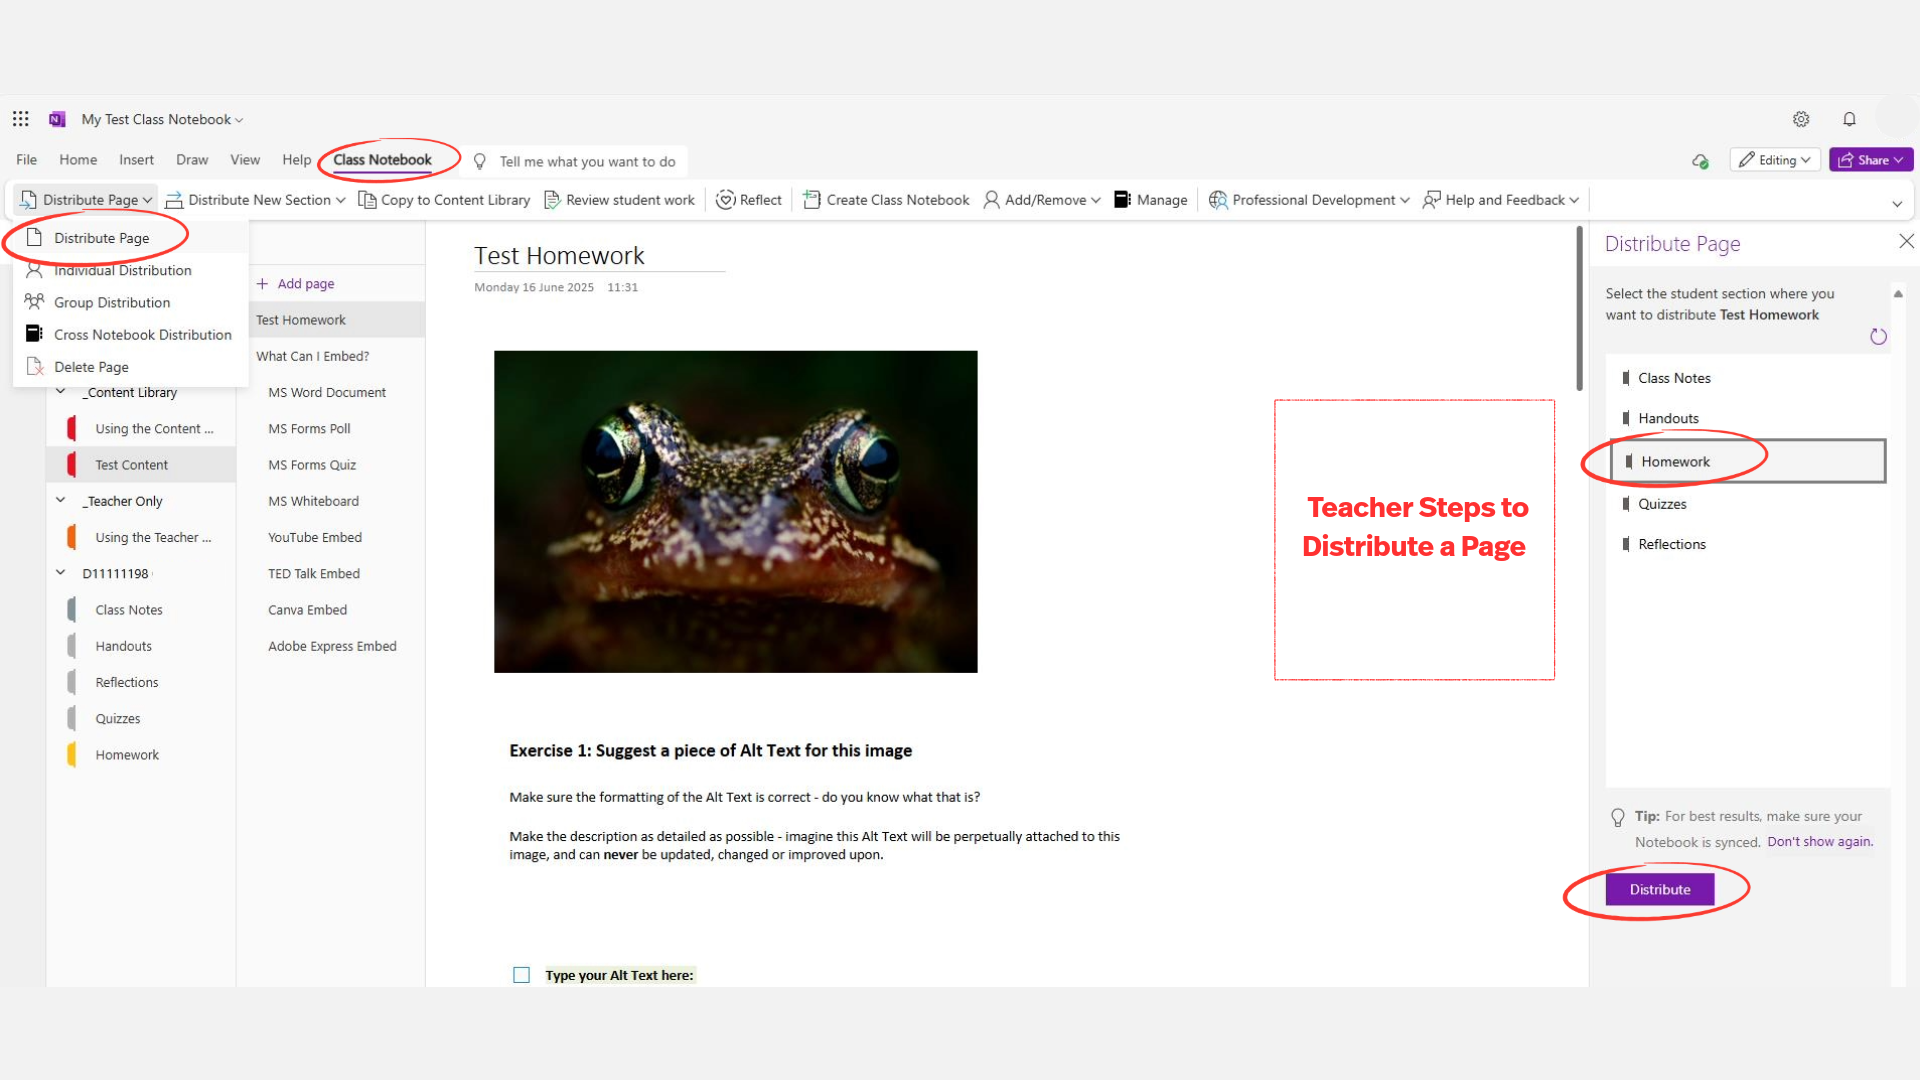
To distribute Teacher content to student sections
Using OneNote Desktop with Class Notebook Add-in:
- Open your Class Notebook in OneNote.
- Navigate to the Teacher-only section that contains the content you want to distribute.
- Select the page(s) you want to send to students.
- Click the Class Notebook tab on the ribbon.
- Click Distribute Page.
- Choose the student section where you want the page to go (e.g., Homework).
- OneNote will copy the page to each student’s Homework section.
Once distributed, the student will be able to see the content in their 'Homework' section, and should switch to Editing mode to begin adding content such as text reflections, images, sources etc.
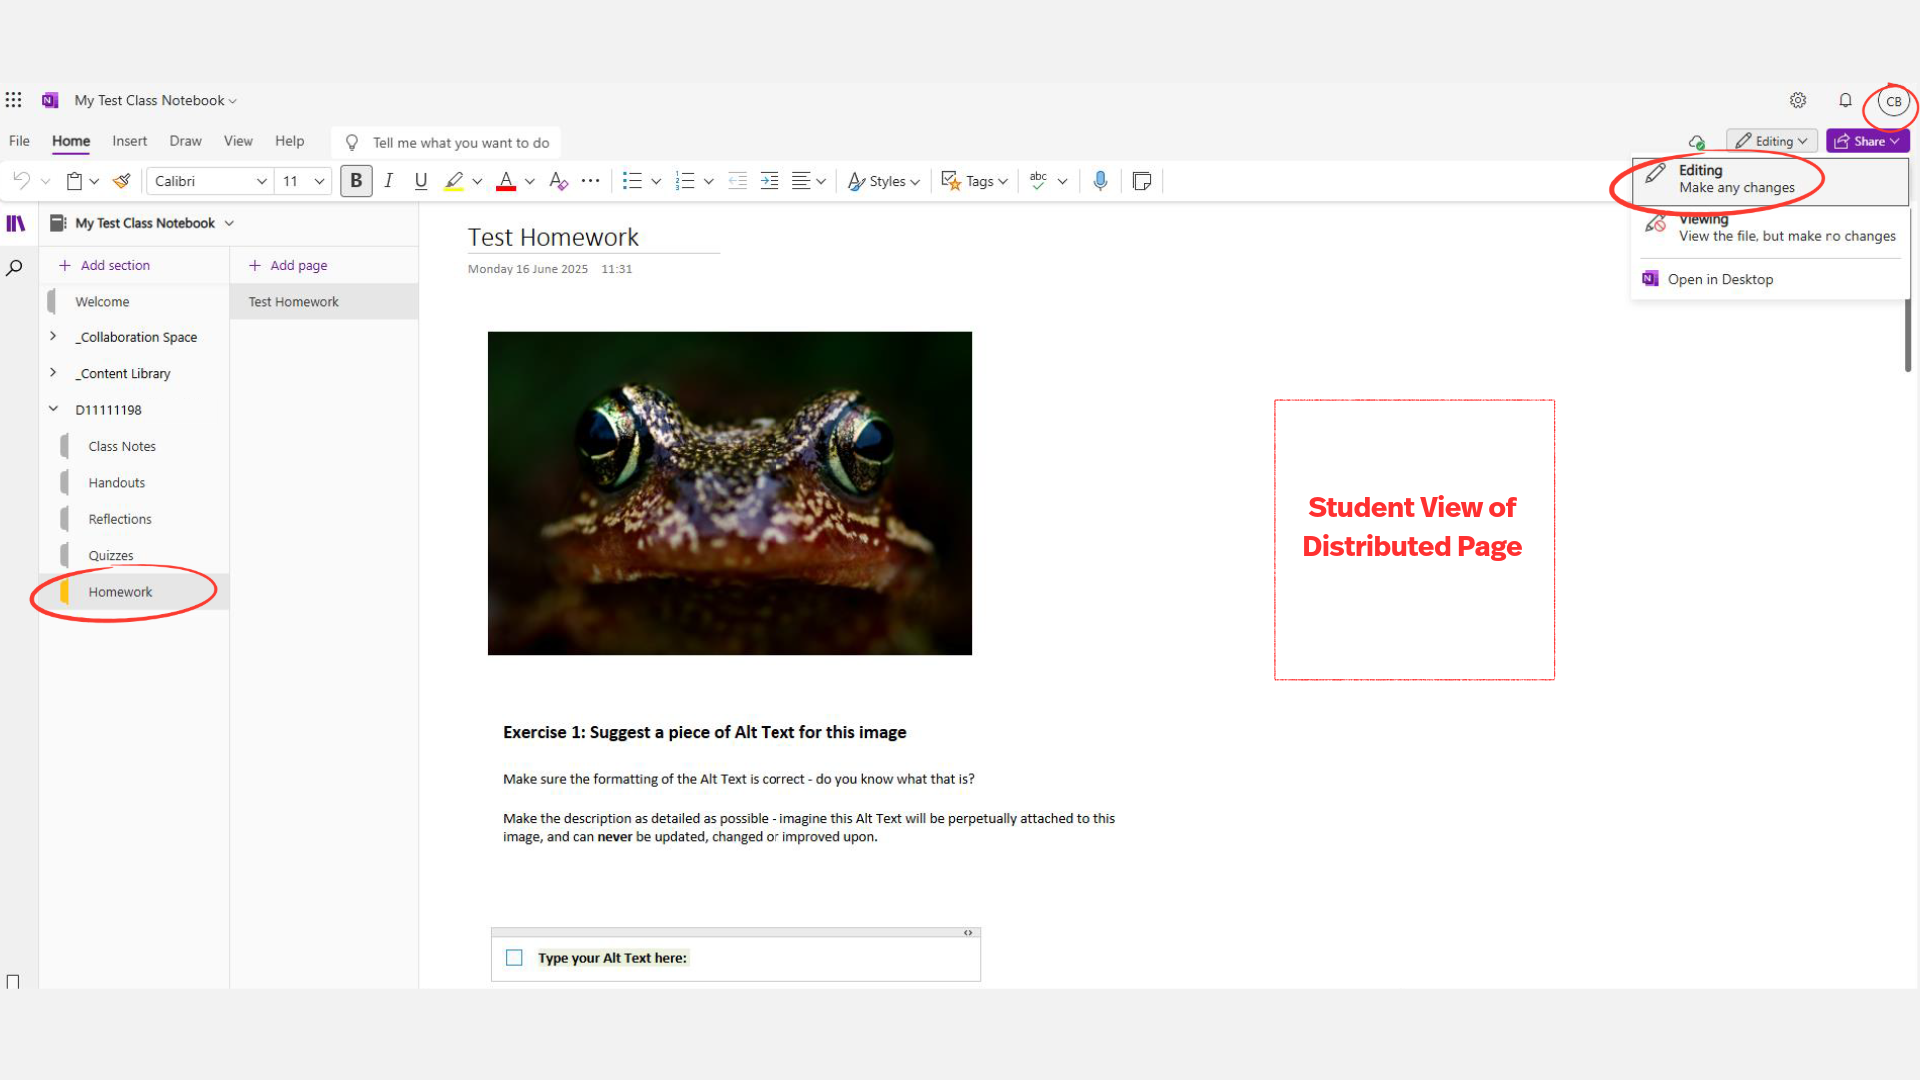
One of the primary advantages of OneNote Class Notebook is the ability to provide personalised feedback to your students in a timely and relatable fashion. This feedback is best given using text, inking, audio notes and stickers.
In the case of a cumulative work process like an ePortfolio, formative feedback can be taken on board by a student and deleted as they amend their entries and continue to progress a project.
However, since feedback can be amended in this way by students, it does make OneNote Class Notebook suitable for formative assessment only within the notebook itself. Of course, work that has been generated within the notebook can also be exported by a student in a format that is suitable for summative grading.
Typed Comments
This is the most common and accessible feedback method.
- Type directly onto the student’s page, using a different colour or font to distinguish your comments (e.g., bold red or italic blue).
- Use a comment bank or shorthand for efficiency.
Inking Options (With and Without a Tablet)
- Surface Pro or Other Touchscreen Device
This works in both OneNote Desktop and the OneNote App.
- Pen settings for optimum experience: Pen + pressure sensitivity + palm rejection.
- Use the Draw tab in OneNote to use different pen types (pen, pencil, highlighter), convert ink to text or convert ink to shape.
- Using a Mouse or Trackpad (No Tablet Needed)
This works in both OneNote Desktop and the OneNote App.
- Again use the Draw tab and select a pen, just draw with your mouse or touchpad.
This method is rougher, but by using the colour and thickness settings, by converting ink to text or shapes, and by highlighting content, you can quickly give a student an indication of where something is working well, or where they might need to improve.
Audio Feedback
Audio feedback adds warmth and tone and is especially helpful for students who process better through listening.
- In OneNote Desktop or App:
- Go to Insert > Audio.
- Record personalised voice feedback directly onto the student’s page.
Stickers and Emojis (Engagement-Oriented)
Fun visuals, emojis, and stickers are good for informal motivational feedback.
- In OneNote Desktop only:
- Go to Insert > More (at far right of toolbar)>Stickers
This resource will show you both the teacher and student view of feedback within a class notebook.
Select the Start button or the link below to access the resource.
Deleting a Class Notebook is sometimes necessary when a course has ended, or when you want to start fresh with a new setup. It’s important to know that removing a notebook is a permanent action and cannot be undone, so you should always make sure any important content has been saved or exported before proceeding.
While the process is straightforward, taking a moment to double-check what you want to keep will help avoid losing valuable teaching materials or student work.
How to Safely Delete a Class Notebook
Before you begin, make sure you have saved or exported any pages, sections, or student work you want to keep. You can copy pages into another notebook or export them as PDF files for reference.
- Class Notebooks are stored in your OneDrive (or SharePoint if created within Teams). Open OneDrive on desktop or online.
- Find the Class Notebooks folder.
- Within the folder, locate the notebook you wish to delete.
- Right-click on the notebook file to delete it. This will permanently remove the notebook file and all its contents.
- Empty your OneDrive recycle bin. To fully complete the deletion, go to your OneDrive recycle bin and clear it.
Remember: Once the notebook has been deleted from OneDrive, and the One Drive recycle bin has been emptied, the notebook cannot be recovered. For this reason, it is important to remind students to save/export any work they would like to retain.
This resource outlines the steps to delete a class notebook.
Select the Start button or the link below to access the resource.
Adding a link to the OneNote Class Notebook within a Brightspace Module
To get the Link to the Class Notebook, open the OneNote Class Notebook via Teams or desktop.
- Go to Class Notebook> Manage Notebooks> Select a notebook to manage> Notebook Link> Copy
- Copy the student-accessible link.
- Next, go to the Content area of your Brightspace module. Select Add Existing Activities > Create a Link
- Paste the OneNote Notebook link. Give it a name like: Your Class Notebook.
- You can also add a description or instructions if you choose.
Important Note: If you add the OneNote Class Notebook to your module as a URL, the students will have to be added separately as well through the OneNote Class Notebook interface. They are not automatically added to the Notebook via the link in the Brightspace module.
This resource will show you the steps to add a class notebook to Brightspace using a URL.
Remember: Content distribution still happens inside OneNote. Once students are in the notebook, you still use the Class Notebook tools (from OneNote desktop or online) to distribute pages to individual student sections, post materials in the Content Library, and use the Collaboration Space for shared group work. The addition of the link in Brightspace doesn’t change or replace these workflows. It only streamlines the pathway to the notebook.
This resource will show you the steps to add a class notebook to Brightspace using a URL link.
Select the Start button or the link below to access the resource.
.jpeg)
If you would like further information about using OneNote Class Notebook for teaching and learning, please reach out to us at DigitalEducation@tudublin.ie
You can also attend one of our online training courses introducing the basics of OneNote Class Notebook.
For upcoming dates and more details, visit the Academic Affairs Training Calendar.